Showing posts with label Git. Show all posts

Thursday, February 7, 2019

Keep Various Versions of Apps with 'Git Branch'

Keep Various Versions of Apps with 'Git Branch'

For some reasons, we need to keep different versions of the same app in the git repository. For example, a new function such as user authentication is added and the old version must be kept in the same time for future reference.

A git command ‘git branch’ can be used to satisfy the need. The default branch of the repository is master, we can create a new branch to preserve the original version (i.e. 01_basic). Then we can keep on developing new function in the master branch.

Create a new branch to preserve the original version.

List all branch name:

> git branch 
* master

Create a new branch ‘01_basic’:

> git branch 01_basic
> git branch
  01_basic
* master 

If we need to switch to the 01_basic branch, just:

> git checkout 01_basic
> git branch
* 01_basic
  master

*: the current branch

Other git operations:

> git branch -m 01_basic basic  // rename branch
> git branch -d 01_basic        // delete branch
> git checkout -b 02  // create and switch to branch 02    

Push all branches to the remote repository (i.e. github.com)

After several modifications of code in the ‘master’ branch, branch ‘01_basic’ and branch ‘master’ have had two different codebases. What if we need to push all branches to the remote repository (i.e. github.com)?

We can do it as:

> git push origin --all
Username for 'https://github.com': chaoyee
Password for 'https://chaoyee@github.com':
   :
To https://github.com/chaoyee/laravel_product.git
   151c1b9..5618f74  master -> master
 * [new branch]      01_basic -> 01_basic

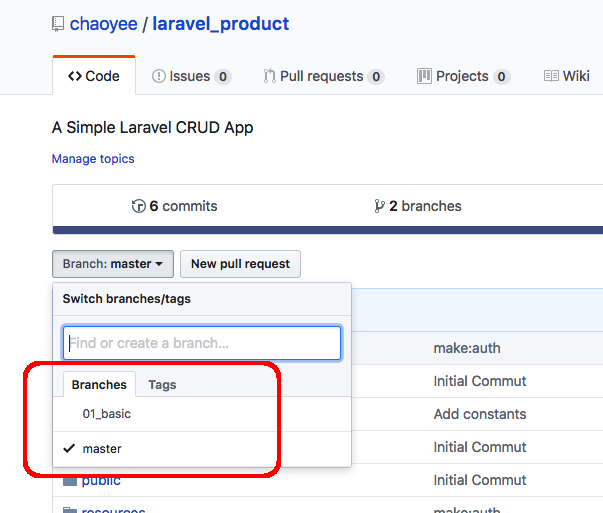
The two branches shown on the webpage of github.com

branch on github.com

Monday, November 5, 2018

Deploy A PHP MySQL Application to Heroku

How to Add Constants in Larvel 5

I usually put my apps on Heroku since I have developed apps in Ruby on Rails. It’s a reliable PaaS service and provides a free dyno for users. Therefore, Heroku is an excellent place to show your apps to others.

Heroku is known as a very friendly PaaS service for Ruby on Rail. Just few git commends, an app in RoR can be easily deployed to Heroku. Now it supports PHP as well. The following steps are the real operations of the deployment of my app to Heroku. It seems that very simple and similar to the deployment of RoR, only clearDB (MySQL) needs to be installed manually.

Install Composer

Composer is PHP’s package manager. Using brew to install composer is the easiest way in macOS.

$ brew install composer

Add An Empty composer.json File in the Root Directory

The Heroku PHP Support will be applied to applications only when the application has a file named composer.json in the root directory. Just add a text file with a pair of curly braces in the root directory if there is no depending package.

composer.json

{}

git commit

$ git add .
$ git commit -m ‘add composer.json file’

Heroku Login

Follow the instruction from: Getting Started with PHP : Set-up

$ heroku login
heroku: Enter your login credentials
Email [chxxxxxx@gmail.com]:
Password: *************
Logged in as chxxxxxx@gmail.com

Deploy the App

Create An App Name

$ heroku create
Creating app... done, ⬢ dry-crag-62595
https://dry-crag-62595.herokuapp.com/ | https://git.heroku.com/dry-crag-62595.git

or

$ heroku create [app_name] 

[app_name]: the name of the app

Show The git remote Configuration

$ git remote -v
heroku  https://git.heroku.com/dry-crag-62595.git (fetch)
heroku  https://git.heroku.com/dry-crag-62595.git (push)
origin  http://github.com/chaoyee/php_crud_demo.git (fetch)
origin  http://github.com/chaoyee/php_crud_demo.git (push)

Deploy the App

$ git push heroku master
Enumerating objects: 300, done.
Counting objects: 100% (300/300), done.
Delta compression using up to 8 threads
Compressing objects: 100% (295/295), done.
Writing objects: 100% (300/300), 1.03 MiB | 10.37 MiB/s, done.
Total 300 (delta 93), reused 0 (delta 0)
remote: Compressing source files... done.
remote: Building source:
remote:
remote: -----> PHP app detected
remote: -----> Bootstrapping...
remote: -----> Installing platform packages...
remote: NOTICE: No runtime required in composer.lock; using PHP ^7.0.0
remote: - nginx (1.8.1)
remote: - php (7.2.11)
remote: - apache (2.4.34)
remote: -----> Installing dependencies...
remote: Composer version 1.7.2 2018-08-16 16:57:12
remote: -----> Preparing runtime environment...
remote: NOTICE: No Procfile, using 'web: heroku-php-apache2'.
remote: -----> Checking for additional extensions to install...
remote: -----> Discovering process types
remote: Procfile declares types -> web
remote:
remote: -----> Compressing...
remote: Done: 16.2M
remote: -----> Launching...
remote: Released v3
remote: https://dry-crag-62595.herokuapp.com/ deployed to Heroku
remote:
remote: Verifying deploy... done.
To https://git.heroku.com/dry-crag-62595.git
* [new branch] master -> master

View Logs

If there is any error, we can view the log for more information.

$ heroku logs --tail

2018-11-05T08:24:32.207801+00:00 app[api]: Release v1 created by user chaoyee22@gmail.com
2018-11-05T08:24:32.313450+00:00 app[api]: Enable Logplex by user chaoyee22@gmail.com
2018-11-05T08:24:32.207801+00:00 app[api]: Initial release by user chaoyee22@gmail.com
2018-11-05T08:29:59.153108+00:00 heroku[web.1]: State changed from starting to up
:
:

Define A Procfile

A Procfile is a text file in the root directory of the application which defines process types and explicitly declares what command should be executed to start the application.

Procfile:

web: heroku-php-apache2

Change Apps Name

Since Heroku generates a random name for the app, we can change it if needed.

$ heroku apps:rename [newname]
$ git remote rm heroku
$ git remote add heroku https://git.heroku.com/[newname].git

[newname]: the new name of the app.

Create ClearDB (MySQL)

ClearDB is a database service based on MySQL Server for Heroku.

$ heroku addons:create cleardb:ignite

Creating cleardb:ignite on ⬢ php-crud-demo... free
Created cleardb-animated-20025 as CLEARDB_DATABASE_URL
Use heroku addons:docs cleardb to view documentation

Get the database url:

$ heroku config | grep CLEAR_DATABASE_URL

=== php-crud-demo Config Vars

CLEARDB_DATABASE_URL: mysql://bf4e1f86266e0e:xxxxxxxx@[us-cdbr-iron-east-01.cleardb.net/heroku_340c60cc91508db?reconnect=true

The format of CLEARDB_DATABASE_URL is:
CLEARDB_DATABASE_URL =>
mysql://[username}:[password]@[host]/[database name]?reconnect=true

Login to MySQL Server

$ mysql -u bf4e1f86266e0e -h us-cdbr-iron-east-01.cleardb.net -p
password: ******
Welcome to the MySQL monitor. Commands end with ; or \g.
Your MySQL connection id is 114469329
Server version: 5.5.56-log MySQL Community Server (GPL)
 
Copyright (c) 2000, 2018, Oracle and/or its affiliates. All rights reserved.
Oracle is a registered trademark of Oracle Corporation and/or its
affiliates. Other names may be trademarks of their respective
owners.

Type 'help;' or '\h' for help. Type '\c' to clear the current input statement.

mysql>

Now, the MySQL Server is installed.

Create Tables and Insert Test data

Using Sequel Pro, MySQL Workbench, phpMyAdmin or other applications to execute sql script and create tables and insert test data.

Adding following PHP code to database configuration (ex. config.php) in the Application in order to connect to MySQL server.

<?php  
$url = parse_url(getenv("CLEARDB_DATABASE_URL"));  
define('_DBHOST', $url["host"]);  
define('_DBUSER', $url["user"]);  
define('_DBPASSWD', $url["pass"]);  
define('_DBNAME', substr($url["path"], 1));

$mysqli = new mysqli( _DBHOST, _DBUSER, _DBPASSWD, _DBNAME);
?>

Deploy Application to Heroku

$ git add .
$ git commit -m ‘add db connection’
$ git push heroku master

Open App at Heroku

$ heroku open

Now, the app starts up in the browser from Heroku service.
Here is the demo app php-crud-demo.
Monday, July 10, 2017

Git Reset to the Certain Commit

Git Reset to the Certain Commit

“git revert”

If I need to delete the change after the last commit, however, it has been committed and pushed to the remote repository. How can I do ?

If you just want to revert to the last commit, the command git revert can recover the change.

git revert HEAD

But in this way, the log would record the revert history in the log as follows:

$ git log
commit 7bcf5e3b6fc47e875ec226ce2b13a53df73cf626
Author: yourname <yourname@yourmail.com>
Date:   Wed Jul 8 15:46:28 2017 +0900

    Revert "a certain change"

    This reverts commit 0d4a808c26908cd5fe4b6294a00150342d1a58be.

commit 0d4a808c26908cd5fe4b6294a00150342d1a58be
Author: yourname <yourname@yourmail.com>
Date:   Mon Jul 6 23:19:26 2017 +0900

    a certain change

Back to a certain commit

If I need to move back to a certain commit ( for example 4 commits ), I can do as follows:

First, git reset to the commit with its SHA value. It would move back to that commit. For example:

git reset a8b5a0afea1e1f5faccda4a698c0002bdcc7bf892

The commit is back to that point, but not the content. The commandgit status would let yo know the files changed during this period of time.

And then:

git checkout -f

The contents will be moved back to the status of that commit.

Finally,

git reset origin/master

Point the commit to the latest position and push. The remote repository will move back to that commit and the change history (commit log) remains.

Friday, November 22, 2013

GitHub Flow

The GitHub Flow mentioned by Scott Chacon is by using a simplified workflow to manage the version control instead of the complicated git-flow.
Here is the points of the whole idea:
  • Anything in the master branch is deployable.
  • To work on something new, create a descriptively named branch off of master (ie: new-oauth2-scopes).
  • Commit to that branch locally and regularly push your work to the same named branch on the server.
  • When you need feedback or help, or you think the branch is ready for merging, open a pull request.
  • After someone else has reviewed and signed off on the feature, you can merge it into master .
  • Once it is merged and pushed to 'master' , you can and should deploy immediately.
There is a web page explaining how to use GitHub in Traditional Chinese, pretty concise!
Here: 在 GitHub 當中使用的 work flow

Easy to follow! Enjoy!

Friday, November 8, 2013

Some notes about Github flow and code review

GitHub Flow: a simplified and useful approach
  • Anything in the master branch is deployable
  • To work on something new, create a descriptively named branch off of master (ie: new-oauth2-scopes)
    git checkout -b Mod0      # -b : create branch locally
                ----\    
                   branch name
    
  • Commit to that branch locally and regularly push your work to the same named branch on the server
    git push origin Mod0
    
  • When you need feedback or help, or you think the branch is ready for merging, open a pull request.
    • from my own module branch to my own master branch )
    • ask for code review from others
    • finally, merge to the master branch
  • After someone else has reviewed and signed off on the feature, you can merge it into master
    • so after this step, we can check out the branch again from Github to the local master.
    git pull origin master
    • do development again.
  • Once it is merged and pushed to ‘master’, you can and should deploy immediately.
    git push heroku master

Tuesday, September 3, 2013

Initial commit

Git operations


This is the very first article of my blog about coding. It's mainly for the learning purpose of Ruby on Rails, git and github, Python and others.  I found that coding is fun, but there are many little tricks needed to be remembered. Therefore, a blog is quite suitable for this kind of thing.

Anyway, a little notes about git is as follows:

 git init                                               # initialize a git repository

 git add <filename>                  # add a file
( git add . )                        # add everything in this directory
 git commit -m "Initial Commit!"        # commit the change

 git status                                             # show status


 git rm filename                                   # remove file

git remote add origin https://github.com/username/repo's_name.git                                                                                                                   # add a remote repository at Github

git push -u origin master                    # push file to remote site                                                                                                                            # origin : remote site
                                                                     # master: local site
 SSH login:

ssh -T git@github.com                            # login using SSH key