Monday, May 25, 2020

The Solution to "Time Machine Couldn't Complete the Backup"

When using Time Machine to backup data to "Backup_Machine" disk, it shows the error message "Time Machine couldn't complete the backup to xxx" above and discontinues the backup operation.  It indicates that it might be the disk problems or file corruptions.  The message also suggests to run Disk Utility to solve the problem.

Disk Utility

So, The first thing is to run Disk Utility to check and repair all files and disk volumes if they have problems.  There are two steps to do so:

  1. Run the Disk Utility within the system.
  2. Run the Disk Utility in Recovery mode (press Command(⌘)and R when booting) .
After running Disk Utility and getting positive result, Time Machine backup operation should continue without any error.   If the problem remains, it shows that there is at least one corrupted file which can not be fixed by Disk Utility.  

The Time Machine Mechanic (T2M2)

The solution is to find out the corrupted file and exclude it from backup operation.  However, the error message from Time Machine does not indicate what exactly the corrupted file is. Fortunately, there is a sweet utility called "The Time Machine Mechanic (T2M2)" written by a friendly person who save our lives.  It shows the system log related to the backup errors, the file name and location.  Therefore we can exclude it from the Time Machine backup operation (see more details). 

If the problem shows again, just run T2M2 and add the file to the excluding list of Time Machine.  Rerun Time Machine again until it completes the job.

Note: The error of Time Machine is "BACKUP_FAILED_COPY_STAGE".

Saturday, March 23, 2019

The Image Library for Laravel: Intervention

The Image Library for Laravel: Intervention

Intervention Image is an open source PHP image handling and manipulation library. It provides an easy way to manipulate images. In addition, it integrates tightly with Laravel.

Installation

  1. Install package
> composer require intervention/image
  1. Integration with Laravel: becoming a Service Provider

Add the following lines into Laravel config file config/app.php. it will be added into the $providers array, which is the service providers for this package.

config/app.php

'providers' => [
      :
      :
   /*
    * Package Service Providers...
    */    
   Intervention\Image\ImageServiceProvider::class,
],
  1. Add the facade of this package to the $aliases array.

config/app.php

'aliases' => [
      :
      :
  'Image' => Intervention\Image\Facades\Image::class,
],  

Now the Image Class will be auto-loaded by Laravel.

Usage

  • View file:

app/resources/views/products/edit.blade.php

        :
<form method="post" action="{{ route('products.update', $product->id) }}" enctype="multipart/form-data">
  @method('PATCH')
  @csrf
	:
  <!-- upload pictures -->
  <div id="upload_pictures">
    @foreach ($images as $image)
      <div class="form-group">
        <div class="col-md-10">
          <input type="file" class="form-control-file" name="prod_img[]" id="prod_img[]">
        </div>
      </div>
    @endforeach
  </div>
  <!-- upload pictures -->

  <a class="btn btn-secondary" href="{{ URL::previous() }}">Back</a>
  <button type="submit" class="btn btn-primary">Update</button>
</form>
  • Controller:

app/Http/Controllers/ProductController.php

use Image;
    :
    :
  public function update(Request $request, $id)
  {
            :
     // Save upload files
     $images = $request->file('prod_img');
     foreach ($images as $key => $image) {
       $img = Image::make($image);
       $img->fit(600,600);
       $img->save(public_path('/prod_imgs').'/'.$id.'_'.$key.'.png');
     }
            :
  }

Thursday, March 21, 2019

My Cryptocurrency: 1. Create A New Wallet

Here is how to create a new wallet for my cryptocurrency at MyEtherWallet.

1. Go to MyEtherWallet web site.
2. Enter a password with at least 9 characters.
3. Press the button "Create New Wallet".


4. After few moment, you will get an address number and a private key.
Remember to save them in a secure place.

If you need to view your wallet information next time, just go to the "View Wallet Info" page and paste your private key.  The "unlock" button will show up after private key is entered. Press it to unlock your wallet information.

This is a easy step, although MyEtherWallet does not recommend. 

5. It shows the wallet info.


6. If there is a custom token which is not recognized by MyEtherWallet, you can add it by yourself.
 

7. Fill up the columns described below and it's done.


8. The wallet has been created! 

Thursday, March 7, 2019

How To Enable Email Verification Functionality in Laravel 5.7

How To Enable Email Verification Functionality in Laravel 5.7

The way to enable email verification functionality in Laravel (>= 5.7) is as follows:

1. Model User preparation

Implement the MustVerifyEmail contract.

app/User.php

class User extends Authenticatable 

change to:

class User extends Authenticatable implements MustVerifyEmail

2. Database table field

Table users must contain an email_varified_at column.

3. Routing

Add verify option to the Auth::routes method in order to activate the Auth\VerificationController.

app/routes/web.php

auth::routes(['verify' => true]);

4. .env configuration

Check the .env file configuration.

5. Default mail host: using Mailtrap.io as mail host

MAIL_DRIVER=smtp
MAIL_HOST=smtp.mailtrap.io
MAIL_PORT=2525
MAIL_USERNAME=xxx
MAIL_PASSWORD=xxx
MAIL_ENCRYPTION=null

Option 1: using Google Mail SMTP server as mail host:

MAIL_DRIVER=smtp
MAIL_HOST=smtp.gmail.com
MAIL_PORT=587
MAIL_USERNAME=xxxxxxx@gmail.com
MAIL_PASSWORD=xxxxxxxxxx
MAIL_ENCRYPTION=tls

Note: The “low security application access” of your Google account must be enable.
And Google will send you a notice and suggest not to enable it for security reason.

Option 2: using Mailgun

MAIL_DRIVER=smtp
MAIL_HOST=smtp.mailgun.org
MAIL_PORT=587
MAIL_USERNAME=xxxxxxx@gmail.com
MAIL_PASSWORD=xxxxxxxxx
MAIL_ENCRYPTION=null

Note: Need to join a pay plan.

6. Views

Make sure app/resources/views/auth/verify.blade.php exists.

7. Where to Redirect after verifying Emails

We can modify the route in VerificationController.

app/Http/Controllers/Auth/VerificationController.php

protected $redirectTo = '/home';

Monday, February 25, 2019

Customization of Blade Directive in Laravel 5.7

Customization of Blade Directive in Laravel 5.7

There is a convenient feature for coding blade templates in Laravel’s view file. It is called ‘directive’. For example, @if and @endif.

What if I need a customized directive? How do I do that?

In my case, I have a long statement in the view file to test if the user is a administrator? I use @if to to do so in the first place. However, it requires the same function in many places and is little annoying to type many words. So I use custom directive to solve this problem and make the code looks more concise.

@if(auth()->check() && auth()->user()->isAdmin())
  <div>
    :
  </div>
@endif

Customization blade statement

Simple steps:

Just put the code in the boot() function of the AppServiceProvider.php. That’s it!

  • app/Providers/AppServiceProvider.php
    (use if statement (laravel >= 5.5))
public function boot() {
  \Blade::if('isAdmin', function() {
     return auth()->check() && auth()->user()->isAdmin();
  });
}

Now, it looks more intuitive and concise!

@isAdmin
  <div>
    :
  </div>
@endisAdmin

Add Change Password Functionality to The Basic Authentication in Laravel 5.7

Add Change Password Functionality to The Basic Authentication in Laravel 5.7

Laravel is an excellent PHP framework with many superb features which ease developers’ burden. For example, the built-in authentication alleviates developers’ trouble of making user authentication from the ground up, which is almost a necessity of many web sites.

Only one command to equip the basic authentication:

$ php artisan make:auth

The functionality includes new user registration, user login and reset password.

However, there is one important feature missing: change password.

This article explains the steps to implement the “change password” functionality after the implementation of Laravel basic authentication. It is based on Laravel 5.7.

Few parts added

Adding new functionality concerns as follows:

  • model (has created!)
  • route
  • controller
  • view

In this case, model User has been created. We just take care of the remaining three parts:

route

Firstly, we follow the naming convention and put the ‘password’ prefix before the name of the routes ‘change’.

routes/web.php

Route::get('password/change','Auth\ChangePasswordController@showChangeForm');
Route::post('password/change','Auth\ChangePasswordController@change')->name('password.change');

controller

The controller named as ‘ChangePasswordController’ under the namespace ‘Auth’ is also follows the naming convention of Laravel authentication. Using artisan command to generate the controller we need.

$ php artisan make:controller Auth/ChangePasswordController

app/Http/Controllers/Auth/ChangePasswordController.php

<?php

namespace App\Http\Controllers\Auth;

use Illuminate\Http\Request;
use App\Http\Controllers\Controller;

class ChangePasswordController extends Controller
{
  public function __construct() {
    $this->middleware('auth');
  }
}

As you can see, the first function we implement in the controller is the __construct() function. It states the user must be an authenticated user who is qualified to change password.

Two more functions are added as follows:

public function showChangeForm()
public function change()

The showChangeForm() function just shows a form to change password, while the change() function does the changing password job.

public function showChangeForm() {
  return view('auth.passwords.change');
}

Note that auth.passwords.change is due to the password related operations are under the directory ‘auth/passwords’.

Here shows the code for the controller as below:

  • app/Http/Controllers/Auth/ChangePasswordController.php
<?php
namespace App\Http\Controllers\Auth;

use App\User;
use App\Http\Controllers\Controller;
use Illuminate\Support\Facades\Auth;
use Illuminate\Support\Facades\Hash;
use Illuminate\Http\Request;

class ChangePasswordController extends Controller
{
  public function __construct() {
    $this->middleware('auth');
  }

  public function showChangeForm() {
    return view('auth.passwords.change');   
  }
  
  public function change(Request $request) {
    $current_password = $request->get('current_password');
    $new_password     = $request->get('new_password');
    
    // User authentication check
    if (Hash::check($current_password, Auth::user()->password)) {
      // Current and new password are the same, meaning user does not change password.
      if (strcmp($current_password, $new_password) != 0) { 
        $request->validate([
          'current_password' => 'required',
          'new_password'     => 'required|string|min:6|confirmed',
        ]); 

        // Change password
        $user = Auth::user();
        $user->password = Hash::make($new_password);
        $user->save();
        return redirect('/')->with('message', ['success', 'Password has been updated!']); 
      } else {
        return redirect()->back()->with('message', ['danger', 'New and current password are the same!']);
      }
    } else {
      return redirect()->back()->with('message', ['danger', 'Password incorrect!']);
    }
  }
}

view

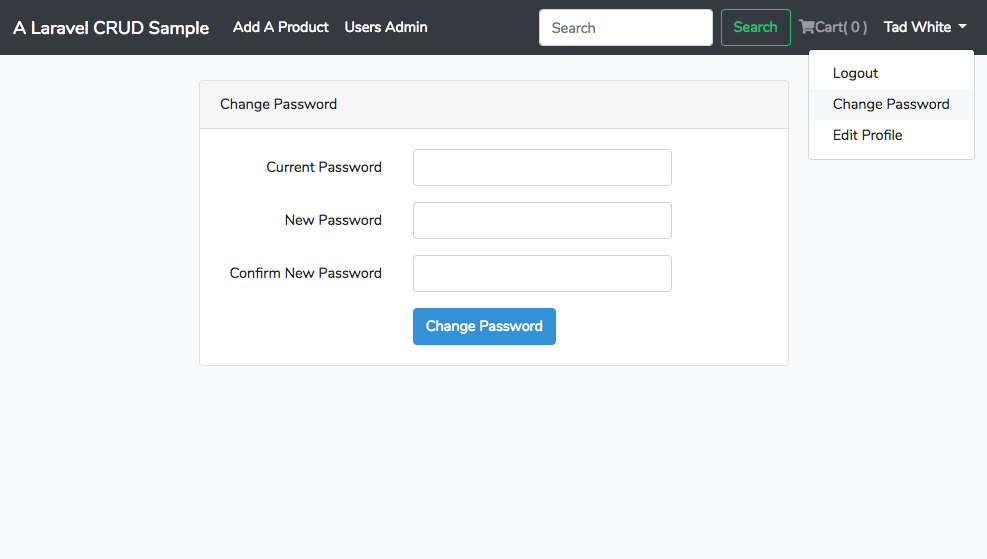
Now, we copy and modify from login.blade.php then create a view file change.blade.php under the directory 'resources/views/auth/passwords`.

  • resources/views/auth/passwords/change.blade.php
@extends('layouts.app')

@section('content')
<div class="container">
  <div class="row justify-content-center">
    <div class="col-md-8">
      <div class="card">
        <div class="card-header">{{ __('Change Password') }}</div>
        <div class="card-body">
          <form method="POST" action="{{ route('password.change') }}">
            @csrf
            <div class="form-group row">
              <label for="current_password" class="col-md-4 col-form-label text-md-right">
                {{ __('Current Password') }}
              </label>
              <div class="col-md-6">
                <input id="current_password" type="password" 
                  class="form-control{{ $errors->has('current_password') ? ' is-invalid' : '' }}" 
                  name="current_password" value="{{ old('current_password') }}" required autofocus>
                @if ($errors->has('current_password'))
                  <span class="invalid-feedback" role="alert">
                    <strong>{{ $errors->first('current_password') }}</strong>
                  </span>
                @endif
              </div>
            </div>
            <div class="form-group row">
              <label for="new_password" class="col-md-4 col-form-label text-md-right">
                {{ __('New Password') }}
              </label>
              <div class="col-md-6">
                <input id="new_password" type="password" 
                  class="form-control{{ $errors->has('new_password') ? ' is-invalid' : '' }}" 
                  name="new_password" required>
                @if ($errors->has('new_password'))
                  <span class="invalid-feedback" role="alert">
                    <strong>{{ $errors->first('new_password') }}</strong>
                  </span>
                @endif
              </div>
            </div>
            <div class="form-group row">
              <label for="new_password_confirmation" class="col-md-4 col-form-label text-md-right">
                {{ __('Confirm New Password') }}
              </label>
              <div class="col-md-6">
                <input id="new_password_confirmation" type="password" 
                  class="form-control{{ $errors->has('new_password_confirmation') ? ' is-invalid' : '' }}" 
                  name="new_password_confirmation" required>
                @if ($errors->has('new_password_confirmation'))
                  <span class="invalid-feedback" role="alert">
                    <strong>{{ $errors->first('new_password_confirmation') }}</strong>
                  </span>
                @endif
              </div>
            </div>
            <div class="form-group row mb-0">
              <div class="col-md-8 offset-md-4">
                <button type="submit" class="btn btn-primary">
                  {{ __('Change Password') }}
                </button>
              </div>
            </div>
          </form>
        </div>
      </div>
    </div>
  </div>
</div>
@endsection

Change Password

Note

'new_password' => 'required|string|min:6|confirmed',

Note that in Laravel validation, when ‘confirmed’ validation is activated, the name of the confirmed field must be ‘xxx_confirmation’. For example, the name of the password field is ‘password’, then the name of the confirmed password field has to be ‘password_confirmation’. That is the rule to enable the confirmed validation.

Friday, February 22, 2019

A Better Message Bar for Laravel

A Better Message Bar for Laravel

Showing a message bar is very common task in writing PHP apps. In Laravel, there is even a built-in command ‘with’ to show a message bar with easy!

For example:

return redirect('/')->with('success', 'It works!');

Message_Bar_success
However, this message bar shows green color only, which utilize class="alert alert-success" with Bootstrap 4 Alerts.

Multiple types of alerts

There are eight types of alerts with different colors which can be classified as different usage. For example, the message with green color means a successful operation, while the one with red color often suggests a dangerous or fail situation.

Bootstrap_4_Alerts

<div class="alert alert-primary" role="alert">
  This is a primary alert—check it out!
</div>
<div class="alert alert-secondary" role="alert">
  This is a secondary alert—check it out!
</div>
<div class="alert alert-success" role="alert">
  This is a success alert—check it out!
</div>
<div class="alert alert-danger" role="alert">
  This is a danger alert—check it out!
</div>
<div class="alert alert-warning" role="alert">
  This is a warning alert—check it out!
</div>
<div class="alert alert-info" role="alert">
  This is a info alert—check it out!
</div>
<div class="alert alert-light" role="alert">
  This is a light alert—check it out!
</div>
<div class="alert alert-dark" role="alert">
  This is a dark alert—check it out!
</div>

The code

Let’s modify the code of message bar in order to show different types of alert.

Before

<div class="uper">
  @if(session()->get('success'))
    <div class="alert alert-success">
      <button type="button" class="close" 
        data-  dismiss="alert" aria-label="Close">
        <span aria-hidden="true">&times;</span>
      </button>
      {{ session()->get('success') }}
    </div><br/>
  @endif
</div>

After

<div class="uper">
  @if(session('message'))
    <div class="alert alert-{{ session('message')[0] }}" >
      <button type="button" class="close" data-dismiss="alert" aria-label="Close">
        <span aria-hidden="true">&times;</span>
      </button>
      {{ session('message')[1] }}
    </div>
  @endif
</div>

Usage:

return redirect('/')
  ->with('message', ['danger', 'You are not an authorized user!']);

Message_Bar_danger

The session key is set to ‘message’ and the value is an array which contains ‘message type’ and ‘message content’.

That’s all!

Thursday, February 21, 2019

Create A Middleware to Have The Admin Check in Laravel

Create A Middleware to Have The Admin Check in Laravel

In the previous post “Adding isAdmin() function in Model User in Laravel”, we create an isAdmin function to check the user’s authority in view files. However, we still need a mechanism to check admin authority in the controller file. In Laravel, on of the checking mechanism is “middleware”. It is specified in the controller’s route to prevent unauthorized requests before controllers.

For this case, we need to create an IsAdmin middleware file first at app/Http/Middleware/.

1. Create Middleware app/Http/Middleware/IsAdmin.php

Using artisan make command to create:

$ php artisan make:middleware IsAdmin

The middleware file app/Http/Middleware/IsAdmin.php has been created.

2. Add codes to the middleware file

Adding the checking codes:

<?php
namespace App\Http\Middleware;

use Closure;
use Illuminate\Support\Facades\Auth;

class IsAdmin
{
  /**
   * Handle an incoming request.
   *
   * @param  \Illuminate\Http\Request  $request
   * @param  \Closure  $next
   * @return mixed
   */
  public function handle($request, Closure $next)
  {
    if (Auth::check() && Auth::user()->isAdmin()) {
      return $next($request); 
    } else {
      return redirect('/');
    }
  }
}

3. Register the middleware IsAdmin.

The next step is to register IsAdmin in the protected function $routeMiddleware of app/Http/kernel.php .

Add the following codes:

'is_admin' => \App\Http\Middleware\IsAdmin::class,

to app/Http/kernel.php:

protected $routeMiddleware = [
  'auth' => \App\Http\Middleware\Authenticate::class,
    :
  'is_admin' => \App\Http\Middleware\IsAdmin::class,              
];

4. Add the middleware before routes that needed to be authorized.

For example, we can add middleware is_admin to the route name products.create:

(before)

route::get('products/create','ProductController@create')
  ->name('products.create');

(after)

route::get('products/create','ProductController@create')
  ->middleware('is_admin')
  ->name('products.create');

Thus, the user must be an administrator to have the right to create a new product.

5. Note: middleware in controller

What if the routes using resources keywords to generate Restful routes and we need to apply middleware to all routes except two of them? (i.e. index and show).

We use the ProductController as an example:

routes/web.php

Route::resource('products', 'ProductController');

There are routes generated by resources:

Method    | URI                     | Route Name      |
-------------------------------------------------------
POST      | products                | products.store  |
GET|HEAD  | products                | products.index  |
GET|HEAD  | products/create         | products.create |
DELETE    | products/{product}      | products.destroy|
PUT|PATCH | products/{product}      | products.update |
GET|HEAD  | products/{product}      | products.show   |
GET|HEAD  | products/{product}/edit | products.edit   |

These routes must apply middleware is_admin except “products.index” and “products.show”. In another word, These routes including “products.store”, “products.create”, “products.destroy”, “products.update” and “products.edit” are allowed by administrator only.

The solution is to put the middleware setting in the app/Http/Controller/ProductController.php to achieve the goal. By adding codes as follows:

public function __construct() {
  $this->middleware('is_admin')->only(['create', 'store', 'edit', 'update', 'destroy']);
}

Note: another keyword is except to exclude the middleware rule.

Adding isAdmin() function in Model User in Laravel

Adding isAdmin() function in Model User in Laravel

It is necessary to create a helper to identify whether the login user is an administrator. To do that, we can add a helper function to Model User.

app\User.php

public function isAdmin() {
  return $this->is_admin == true;
}

By checking the field is_admin, we can get the answer.

Thus, the isAdmin() function can be used by index.blade.php for showing the functions that only available for the administrator, such as “Add New Product”, “Edit Product” and “Delete Product”.

index.blade.php

<!-- Check if user is an administrator  -->   
@if(Auth::check() and (Auth::user()->isAdmin() == true))  
  <td><a href="{{ route('products.edit', $product->id) }}" 
  	class="btn btn-secondary">
  	<i class="fa fa-edit"></i>Edit</a></td>
  <td>
    <form method="post" action="{{ route('products.destroy', $product->id) }}">
  	  @method('DELETE')
  	  @csrf
  	  <button type="submit" class="btn btn-danger">
  	  <i class="fa fa-trash"></i>Delete</button>
  	</form>	
  </td>
@endif

Note that Auth::user()->isAdmin() may return null if the user is not login and it will make mistake. Therefor, we must check if the user is a login user by using Auth::check().

@if(Auth::check() and (Auth::user()->isAdmin() == true))
   :
@endif 

The isAdmin() function can be used to check if a login user is an administrator. It keeps guests and unauthorized users out of the functions only available for administrators in view files.